Tamilnadu Government is giving Laptop to Government and Aided institute's HSC and Arts college students. The manufacturer of the laptop is most probably Lenova, HCL or Acer. The size of the hard disk in the Lenova laptop is about 300GB. Now, In this post I'm going to show you how to resize the linux partition so that you can use that partition (which will have the size of around 88GB) without deleting the BOSS Linux. You must also remember that Removal of BOSS Linux may cause the warranty of the product.You can also download this guide as pdf for your future reference.
They have partitioned the laptop in the following way:
- 59GB - Local disk C
- 141GB - Local disk D
- 98GB - This partition is allocated to BOSS linux
Why should I shrink the linux Partition?
- You can't use the 98GB linux partition in Windows.
- 6-10GB is enough for linux.
- We can both read & write NTFS (Windows partition) in linux.
- We can't even read a linux partition in windows.
- Most of us will not use the BOSS linux often. So you can utilize the unused linux partition.
Important Instructions
- This tutorial may seem boring and difficult but it is very easy to follow if you read it step by step.
- Please read all instructions line by line.
- Please don't skip any sentence.
- Do things as instructed.
- If you fail to follow the above instructions you may lose your data.
- Nothing will go wrong if any help needed just leave a comment I'll help you.
Things needed
- A pendrive
- 2GB USB flash drive is enough
- Linux .iso file Linux mint - Size 978 MB
- Unetbootin application - Size 5 MB
Difference between mint and puppy linux
Apart from size there are some differences between Linux mint and Puppy linux. Linux mint has an elegant GUI whereas Puppy linux has a simple GUI. Otherwise you can do the operation in both.
Instructions
Step 1:
- Put all the downloaded files in desktop.
- Open Unetbootin.
- Now, follow the arrows in order that is in the image.

Select the downloaded . iso file

Here Drive o denotes the path of the pendrive.
Now, press OK.

It will take some minutes to extract if you see the following image half of our work is done.
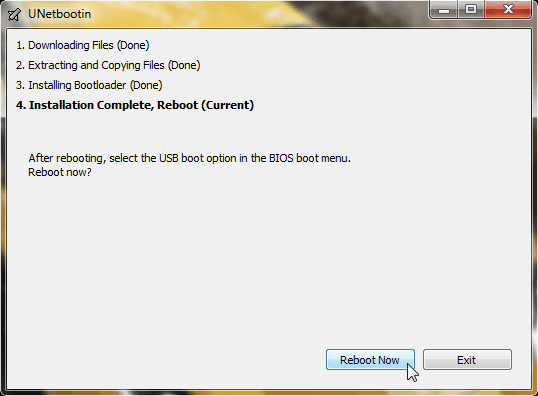
Now, we are ready with the pendrive. We must boot into the live linux session in order to shrink the linux partition.
Step 2: Booting your system using pendrive
- Plug pendrive to your laptop.
- Now, switch on your laptop and and press F12 as soon as the white screen appears now, select your usb and press enter.
- Now, you will see a blue screen select the option "Default" and press enter.
- Now, you will see a linux destop.
- Open the application Gparted (It is a partition manager).
- I'm using Linux mint 10 in this guide.
- In Puppy linux It will be in Menu ---> System ---> Gparted.

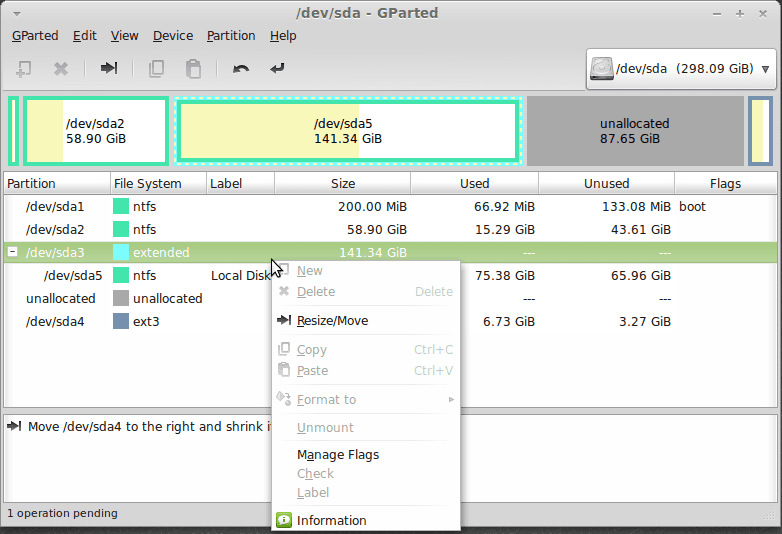
Now, right click /dev/sda4.
Then, select Resize/Move.

Here,

Below I try to feed you some knowledge regarding the types of partitions we are going to face in this tutorial
Primary
Usually primary partitions have the operating systems and boot partitions. We can only have four primary partitions in a hard disk.
Logical
We can have many Logical partitions in a hard disk.
Extended
Extended partitions are only in linux. It is invisible. It can't be seen in any file explorers. It is an Imaginary partition. This partition acts as a container to all logical partitions.
So, Extended Partition=Sum of all logical partitions.
Here, the following image illustrates the partition setup of our laptop

Now, we are going to resize the linux partition to 10 or 15GB. (I'm going to resize the linux partition to 10GB).
Now, drag the inside bar from left to right.
Note: Don't do this reverse (From right to left). Try to keep minimum amount of data(MBs) in the free space following. Make use of the up and down arrow keys which is in the Resize/Move-/dev/sda4 window.

See the following image I have set 10GB for linux partition.
Now, press Resize/Move.

Now, we should extend the extended partition in order to create a new partition or to extend the existing one (Local Disk D) using the spare unallocated space.

Now, right click sda3 and select Resize/Move.
Now, drag the inside bar from left to right as possible as you can.

Now, select Resize/Move.

Step 3:
If you want to create a new windows partition (Local disk E) continue reading the article
If you want to extend the existing windows partition (Local disk D) click here
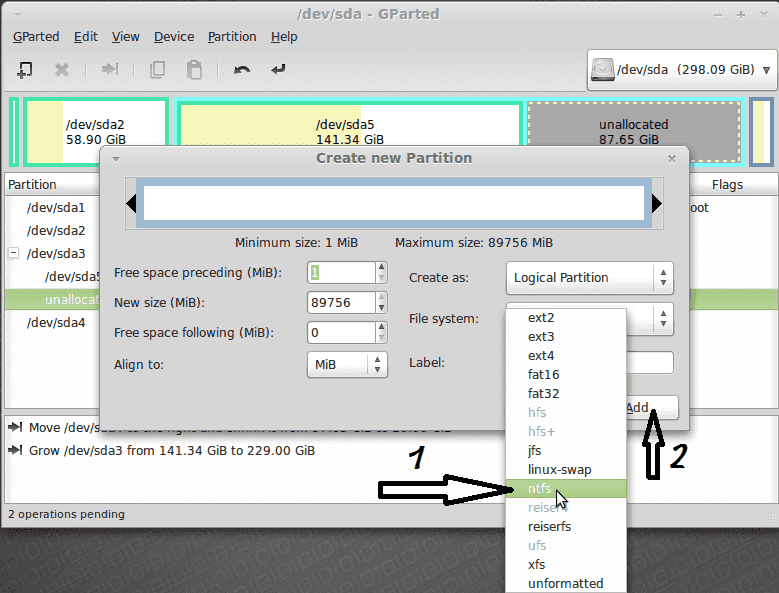
Now, right click the unallocated space and select new.

- Now, select logical partition in create as.
- Select NTFS partition so that you can read and write the partition in both windows and linux.
- Then, select add.
- Try to keep minimum amount of data(MBs) in both free space preceding & free space following.
Then Click here.
Step 4:
Extending sda5 (Local disk D) means extending the size of it. Simply it is using the 88GB unallocated space to extend the Local disk D.
If you extend Local disk D using the spare unallocated space, Local disk D's new size will be 141+88=229GB.
Now, right click sda5 and select Resize/Move.

Now, drag the bar from right to left.

Try to keep minimum amount of data (MBs) in both free space preceding & free space following and then press Resize/Move.

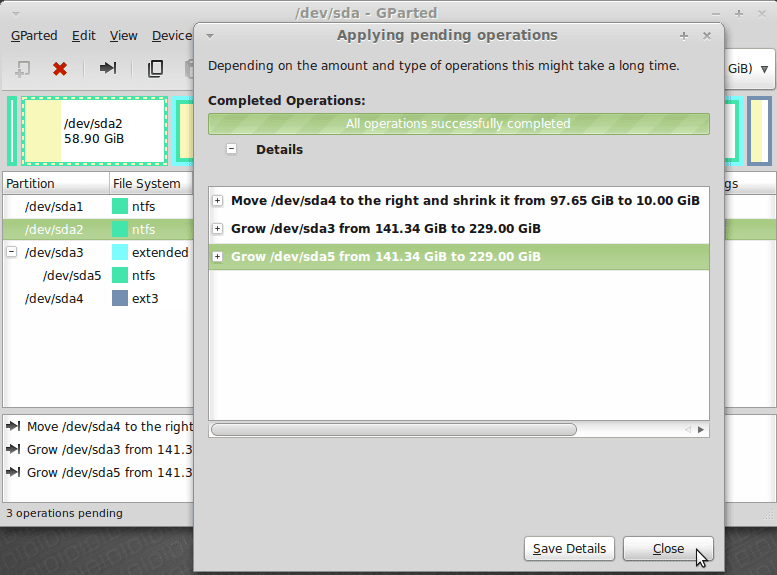
Step 5:
Now, select Edit --> Apply All Operations.
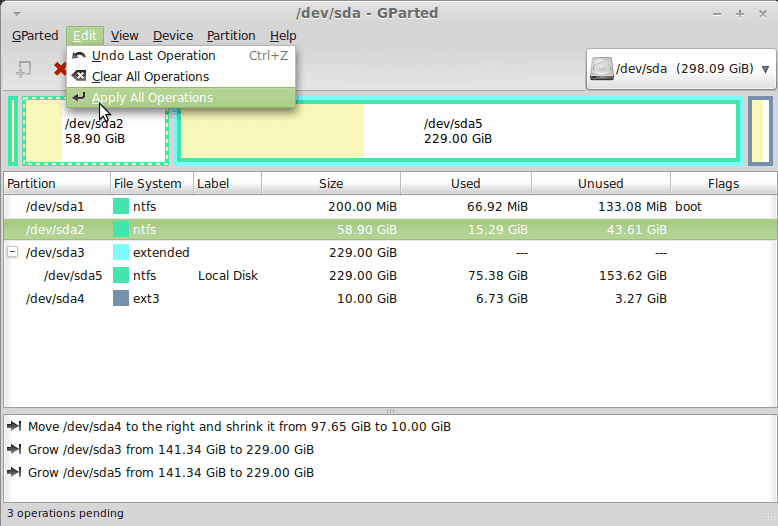
Now, ignore warning and select apply.

It will take about 10-15 minutes to complete all tasks. Be patient.

You would see the following image if all things were done successfully.
Now, restart your laptop and unplug the pendrive.
Conclusion
You must use linux to protect your files from virus. You may have a powerful antivirus but no one can assure that your antivirus program will find and delete all kind of viruses & malwares. So use linux for virus free computing experience. However here the warranty must be taken into account. I hope this guide will be useful to someone those who wants to keep BOSS linux in the hard disk. . . . I will try to give you proper knowledge about linux in my future posts.......