What we ever want to do when we grab a new PC or laptop? The first and foremost preference is given to partitioning. Whatever the memory of the hard disk, we tend to partition it according to our own needs. 100GB for education, 250GB for entertainment it depends on the person who owns the device.
The most general question is could I do partitioning without losing any data or harming the operating system? Answer from my side is yes, you could do partitioning on your own without any risk. So, in this post I have explained how to do partitioning in a PC or laptop.
Before you read further: If you don't know anything about booting, partitioning and related stuffs, don't worry. Everything is new to all at the beginning. Just keep at the stream of content flow, I am sure, you will get to know what you need to know to successfully perform the required task..
Partitioning methods
- MBR - Master Boot Record
- It's an antique method of partitioning. In this method, you can have a partition up to 2TB. You can allocate a maximum of 4 primary partitions. Using some techniques, you can have more than 4 partitions in a MBR partitioned system.
- GPT - GUID Partition Table
- GUID Partition table is a part of UEFI, which was invented by IT giant Intel to get rid of the limitation of 4 partitions and maximum limit of 2TB.
With this method you can have more than 100 partitions depending upon the operating system you use and The maximum size of one partition being 9.4ZB (1ZB = 1024 x 1024 x 1024GB).
How to find how your disk is partitioned
- Press Windows key + R, then type diskmgmt.msc. Hit enter.
- In the Disk management window, Below the list of partitions, Right click the hard disk you use and select properties.
- In properties window, select volumes tab.
- Under partition style, you may notice what you need.
Precautions to be made
- First of all you have to label all the visible partitions in your system to identify it later.
- Open Windows explorer by pressing Windows key + E.
- Select partitions one by one and press F2.
- Name that drive so that, you can recognize it later.
- Example: Name your Local Disk C as Windows as it have the Windows operating system. Likewise name all the partitions.
GParted, the hard disk saviour
Believe it or not no matter how your disk is partitioned when it comes to partitioning many experts go for a GPL Linux based program GParted instead of any other Windows utilities. As, it provides the most safest environment to divide a hard disk into usable chunk of LocalDisks (Windows slang). I even have tried most of the Windows utilities like EaseUS, Minitool, Parted Magic.
Nothing works finer than GParted. Once, I lost my valuable data while partitioning with one of the Windows utilities mentioned above. Until then, I experimented a lot more things. Eventually, I'm using GParted which I like most when it comes to partitioning and I have done this in more than 20 times in different devices. So, you need to have GParted to get more from this article.
Where can you get GParted
GParted can be booted from a CD or USB. GParted live iso files are available in the internet or you can even use the iso file of any Linux distribution.
If you don't have any Linux distribution CD or iso file, then you can download GParted live (Size: near to 180MB). There are three versions available for you.
Go for i486, if your PC is old and it has only one core processor. Download i686 if your system can support 64bit operating systems. GPT users must use amd64 version.
If you are going to use a live Linux, after booting into the desktop, you could be able to open GParted using menu.
If you are using GParted live iso, follow the below steps.
- Initially, you will go through a command prompt like environment. But after completing several steps, you would end up in a Graphical interface.
- First, press enter after highlighting default settings.
- Press tab, and hit OK for Don't touch keymap.
- Choose your language by entering the appropriate number. Then hit enter.
- Then, you will be asked "Which mode do you prefer?".
- You must choose "Continue to start X to use GParted automatically". To do so press 0 and hit enter.
- Now, you will see the GParted main window.
Use this guide to create bootable USB: How to create bootable USB drive
GPT users must have UEFI enabled machine. You might not able to boot your PC using an external media. This guide must help you (Read the content inside green color bar).
Important Note: All screenshots in this articles are the windows of the program GParted. Screenshots are provided for the sake of understanding. First the nature of different partitioning types are explained. Later, the stuff needed to do partitioning on your own will be explained. It doesn't matter whether you have GPT or MBR. Read the content explained under your section with utter care.
Now, go with what you need,
I have GPT
All modern 64-bit systems come with this type of partition table. It is the versatile and easy to use method comparing to MBR. It eliminates the limitations of MBR systems. If your disk is partitioned in this method, It will be more easy to explain needed things. See the image given below, It is the partition table of one GPT partitioned system.

Take a closer look at the image, It has more than 4 primary partitions. So, you can create partitions as you wish.
You can directly skip the following section and go to Add, Delete, Resize partitions using GParted as you have a GPT system.
I have MBR
Despite being the oldest way of partitioning, still this method is followed in many places. As stated earlier, strictly, you can have 4 primary partitions. But, you can even create 128 partitions using a simple workaround. There are three type of partitions in MBR method. They are,
- Primary partition
- Extended partition
- Secondary partition
You need to remember just two things when you work with MBR partitions that is,
4 primary partitions
Extended partition = Sum of all secondary partitions
You would become a professional in MBR partitioning if you ever remember the above two magical phrases. I can say your MBR lessons are finished with those two phrases. To make things clear I explain it further. Remember one thing extended partition itself a primary partition.
So, to have many partitions you must have 3 primary partition and one extended partition. One extended partition can be divided into a maximum of 128 secondary/logical partitions.
First, take look at the picture given below.
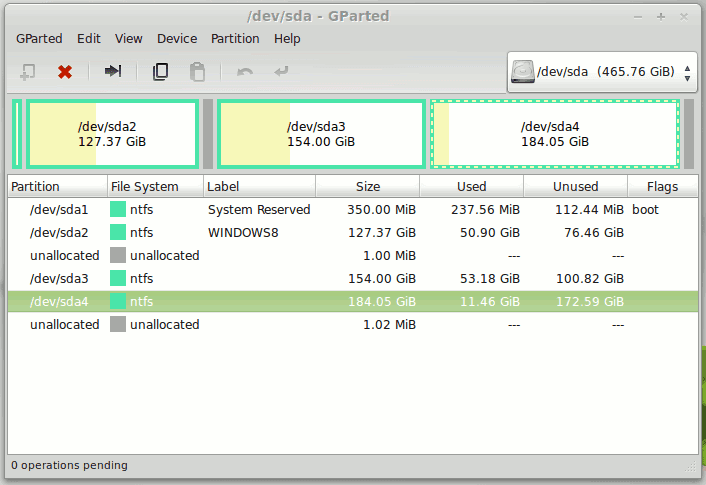
It is a simple partition table of a MBR partitioned system. Yes, It has 4 primary partitions. But, It doesn't have any extended partition. It is clear that you can't have more than 4 partitions in a MBR partitioned system. To make it clear I am going to create a new partition using GParted.
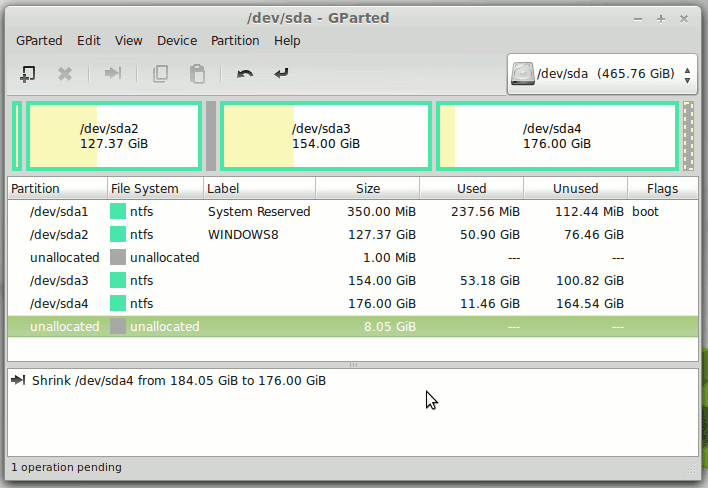
Lets see what GParted throw at us, when we try to create a new partition. To create a new partition I shrunk the 184GB to yield 8GB unallocated space.
Please don't be confused about how I shrunk the partition and how I'm going to create a new one. I have explained all necessary things in the later part of this article. So, be patient.
Now, when I try to create a new partition, an error occurs. See the image below to know what GParted comments about the operation.
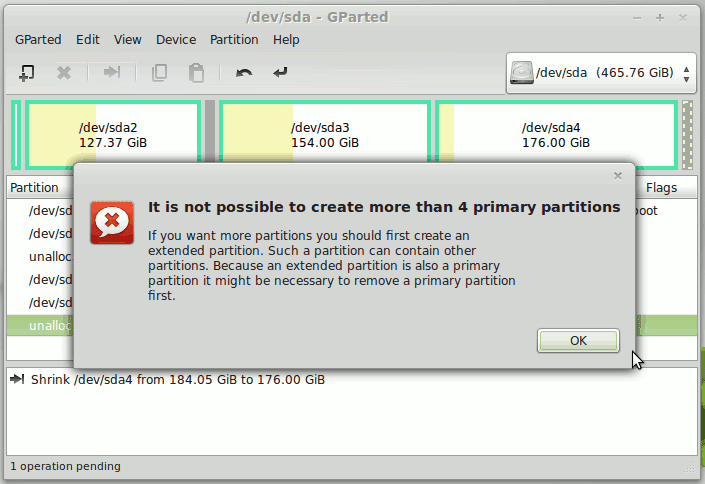
So, there is no way you can create one another partition in the partition table of example. The only way to create more partitions in that partition table is to create an extended partition. You know that extended partition is also a primary partition.
To create an extended partition, you must delete any one of the partition to make room for an extended partition. Before deleting that 184GB partition, I have backed up all the data required.
I delete the 184GB partition to create an extended partition. See the below image, there are only three partitions. Now, you can create a primary partition and that one must be an extended one.
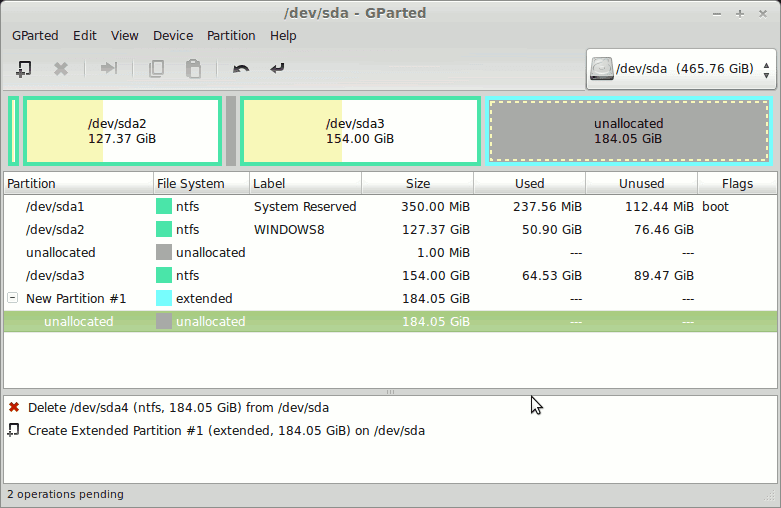
An extended partition is created to make more partitions.
Under the extended partition, you can see that the memory equivalent to the space allocated to extended partition appears as unallocated space. That unallocated space could be used to create as much as partitions you like to have.
Extended partition acts as a container of all secondary/logical partitions.
Note: Extended partition is just an imaginary one and It couldn't be used to save or store any data. Only the secondary or logical ones created using the unallocated space under extended partition, can be used to save data.
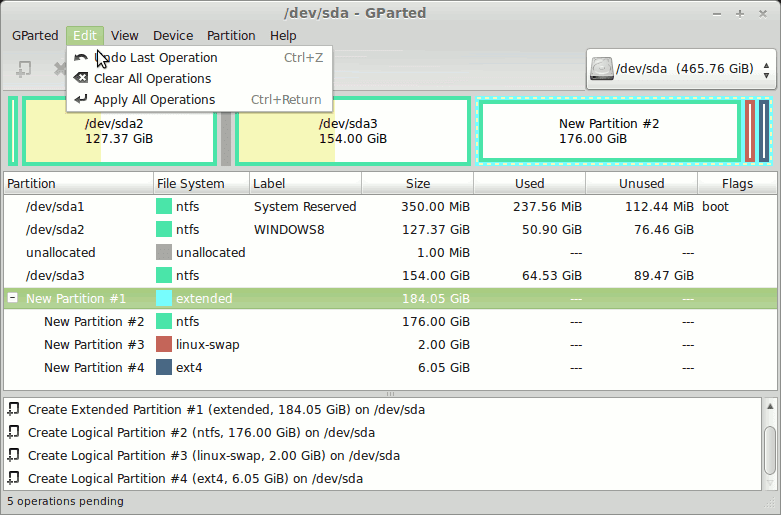
Now, I create 3 partitions in that unallocated space provided by the extended partition. You must understand the basic knowledge fed to you. I have created a ntfs partition, a Linux swap and an ext4 partition for my own needs.
With that unallocated space, I could create 18 ten GB ntfs partitions or 9 twenty GB ntfs partitions and it totally depends upon the need of the system owner. You can do whatever you want.
After creating the 18 ten GB or 9 twenty GB partitions, a 4GB memory is left as unallocated. You can't utilize any unallocated space in your partition table. To make it usable, that unallocated space must be included in a partition or it must be created as a new partition.
Now, I hope you have basic knowledge about everything you have to know about MBR. It's the perfect time for you to do partitioning in your MBR system on your own. Continue with this:
Add, Delete, Resize partitions using GPartedAdd, Delete, Resize partitions using GParted
The very first thing you see, when you open GParted is your partition table. You have opened it to manipulate your partitions for your own needs. To add, delete or resize partitions is up to you. I will show you how to do all the operations mentioned.
Note: In GParted no changes will take effect, unless or until you select Edit → Apply All Operations → Apply. You can also revert any changes you made, if you didn't apply any operations. Refer to the following gif animation.
Warning: Check the whole table, before hitting Apply button. Lost data might not be brought back. Double check the label to confirm that, you are working with the correct partition.
Adding
First adding, you must have unallocated space in your hard disk to add a new partitions. If you don't have unallocated space in your table first scroll down and read resizing and deleting section and come back to here.
When you add partitions, don't forget to set ntfs as filesystem. Else, it will not be recognized by your Windows system.
For MBR users: To create extended partition same procedure can be applied, new → Create as → Extended Partition. (Refer to the above animation). For your reference, after adding an extended partition your partition table will look like the below screenshot. Now, you can add as much partitions as you want with the unallocated space below the extended partition.
Deleting
Be sure, you don't have any needed data in a partition before deleting it. After deleting a partition, it would be converted into an unallocated space which can be utilized to extend existing (comes under resizing category) partition or to create new partition.
Just right click the partition you need to delete and then select delete. Select Edit → Apply All Operations to save changes.
Resizing
Resizing is not a big deal, it is about shrinking or extending an existing partition that's all. You might want to shrink the size of any local disk to extend the partition following it or preceding it or simply you would like to have a new partition. It's confusing correct?
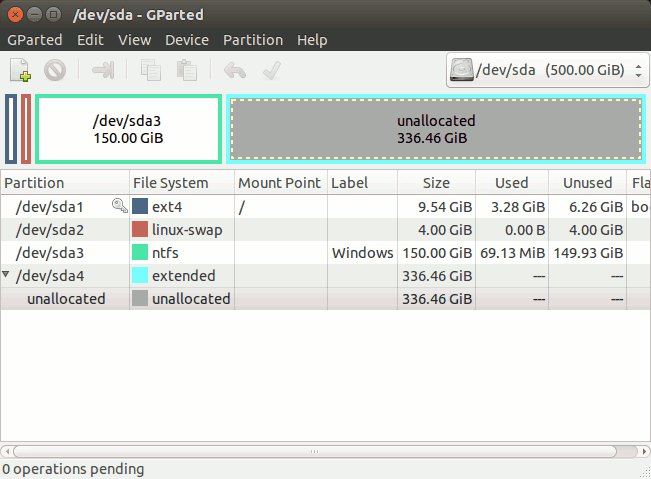
To explain you what I told above, I have given a gif animation below, watch it carefully.
- Look at the gif image there are two partitions one labelled Windows (150GB) and other labelled Data (336GB)
- Eventually, Windows is resized to 100GB to extend Data to 386GB
- While resizing, you can also enter the correct numerical value of the new size. Instead of dragging the bar to left or right.
Ex: I want to shrink Windows by 50GB, initial size of Windows is 150GB. Hence, new size would be 150-50 = 100GB (100 x 1024 = 102400MB). - You must note that I dragged the block (102400MB) to extreme left. So as to get the unallocated space in extreme right of the 100GB partition.
- If I drag and leave the block to the middle of the bar, then unallocated space will be created in both left and right of 100GB which is unwanted in my case.
- I need to add the spared 50GB to the Data partition. So only I dragged the block to extreme left.
- Now, as you see in the animation, Data partition is successfully extended to 386GB.
Note: During resizing the partition you may come across some warning like "moving partitions may cause the operating system fail to boot" Just ignore this warning and press OK. You might wonder that ignoring the warning could cause a boot problem. It rarely occurs. If it occurs, it can also be solved easily by startup repair.
Sometimes for the sake of proper alignment of partitions, GParted will automatically create some unallocated space (say 1MB) between partitions. If you can't add that unallocated space to any partition both above and below, leave it as it is.
Warning: Moving partitions may take time, and it totally depends upon the size of the partition you move. Be patient. It will not take for ever.
Don't forget to apply changes after performing required changes. You have just finished reading a 2000 word article. Cheer me up with your valuable comments that will make me do some good work...:)
It is my pleasure to answer you. So, please don't hesitate to comment your question. If you have followed this article to do partitioning in your device, comment the results as it may encourage the future readers to follow this article.
If you find this useful, kindly share this article in social networks....