
How to Get Image URLs from Google Drive
For most of us, Google Drive is the go-to place to store files, especially images. The main reason is almost everyone has a Google account now & Google Drive is free to use for up to 15GB. It is also easier to share files with others.
The first part of this article explains how you can get the link to a single image & the ways you can use them. The second part of the article will enable you to generate URLs of multiple images quickly & efficiently in bulk.
A URL is used to share something with others. Hence, when you need the URL of an Google Drive image, that means you must have shared it with someone to use it else only you can use the link.
From the Google Drive Dashboard
- Go to Google Drive.
- Right-click the image for which you want the link.
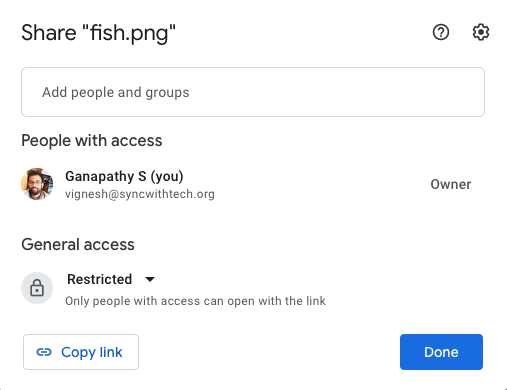
- Select Share. In the submenu that opens, click Share again.
- Now, a dialog opens. Here, you can select with whom you want to share the image. Enter one or more emails and select send.
- Choose Copy link to get the link.
The link obtained above needs the users to be logged into their Google account. This is to verify if they have access to the image. This method is good for sharing personal photos.
To Make the image accessible to Everyone
When you want the image to be accessible to anyone on the internet, after the third step from the above method, under General access click on restricted and select Anyone with the link.

Now, the link will work everywhere and won't want users to login into their Google account.
Using the Google Drive for Desktop App
First, install Google Drive on your system to use this method. The app will sync all of your Google Drive on your desktop. Don't worry it won't fill up your disk space. It syncs the files by streaming meaning, your system will only have a virtual copy of your Google Drive.
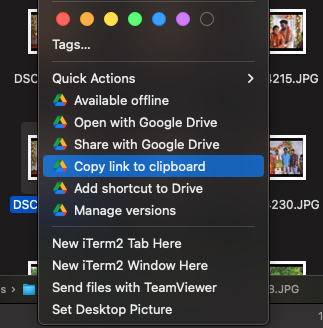
Open Windows Explorer (Finder on Mac). You will find Google Drive on the sidebar. Select it and browse the image of your choice. Right-click the image and select Share with Google Drive to change who has access to your image like the above method.
Now, right-click again and select Copy link to clipboard to get the link.
Different ways You can use the Image Links
The link you get using the above two methods will be in the following format.
https://drive.google.com/file/d/1h1d8lihVW40DEKAhe8LioN8EfzoEVL1Y/view
When you open the link, you will see the image inside the Drive image viewer. You might not want that. You can alter the URL slightly to use it in the following 3 ways.
The only thing you need is the file ID of the image. Remember that, in the above URL, the marked part is the file ID and you need to replace FILEID with your image ID in the below 3 sections.
Direct Download the Image
This will force an image download when opening the link in other words it's a direct download link of the image.
https://drive.google.com/uc?id=FILEID&export=download
Embed/Host the Image on a Website
You can directly host a Google Drive image on your website using this method. Here, you have to ensure that you changed the share setting of the image to Anyone with the link for this method to work.
<img src="https://lh3.googleusercontent.com/d/FILEID" />
Render the Image inside the Browser
You might want to render the image on the browser without the Google Drive viewer. In that case, you can format the URL like below.
https://drive.google.com/uc?id=FILEID
Tip: If you share the folder containing the images with Anyone with the link all the images inside it will share the same permission setting. That way you don't have to change the permission settings for every image.
The problem
More often than not, you would want to generate image links for many images at a time. As an example, we can take a WooCommerce store owner wanting to get image URLs of his products from Google Drive.
Looking to generate image links for your eCommerce products? I’m working on an exclusive product just for that. You can submit your interest here!
The methods discussed above will not be useful in that case. You need methods that scale well.
How to Generate image URLs in Bulk
There are two tools that can help us with this. Both are capable of doing more than just link fetching. For example, showing Google Drive folder size.
- Drive Explorer - A Google add-on to list your Drive files.
- Rclone - A command line interface to interact with cloud storage services.
Using Drive Explorer
Drive Explorer can list your files on a brower tab or inside a Google sheet. Let's first see how to fetch image URLs using it.
- Install Drive Explorer.
- Open Google Drive.
- Select & right-click the folder containing images/multiple images.
- Choose Open with → Drive Explorer.
- Under Fields dropdown, select Preview Link.
- Select Fetch files.
- Click the Export CSV button to download the links.
In the list of fields, you can use the Download link column URLs for directly downloading images. Preview link column can be used for embedding & rendering within the browser.
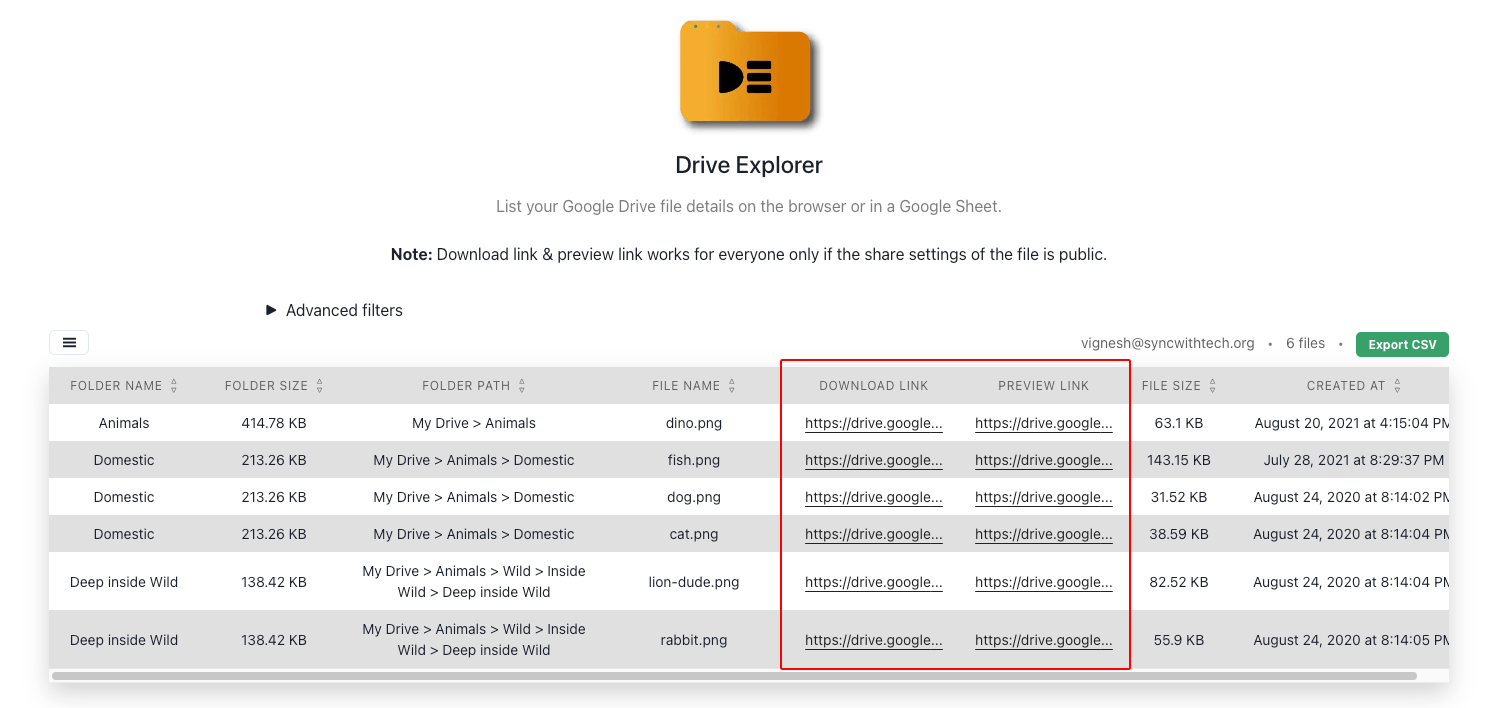
Note that, you must have changed the permission settings of the images already for the links to work as expected. You can ensure that by selecting Share Status along with Preview Link during step #5 mentioned above.
When using Drive Explorer in a Google Sheet, you can change permission details of files/folders, rename files and much more without leaving the Sheet.
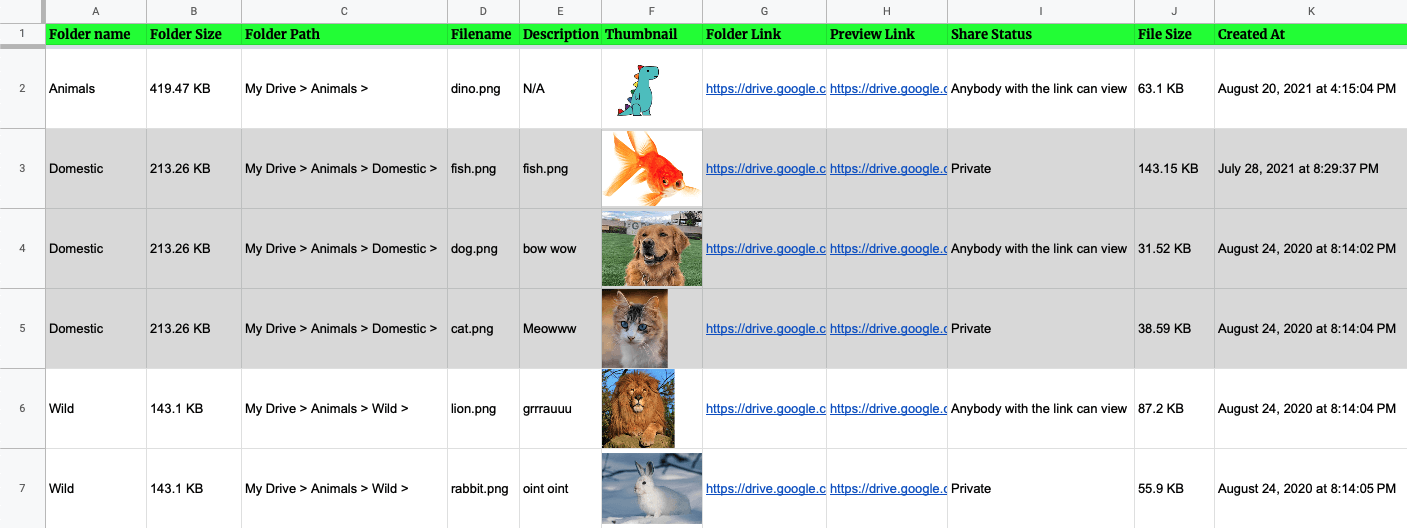
Image Links that end with .png, .jpg or .jpeg etc.,
Some cloud services only accept image URLs ending with an extension directly linking to the image. Image links from Google Drive redirect to a different URL to render or download the image. For example,
https://upload.wikimedia.org/wikipedia/commons/c/c3/Conifer_forest.jpghttps://drive.google.com/uc?id=1r3yRTh2K5KT5WmKlFYr25IWH46-gGoGK&export=view.
#1 opens the image without any redirection, ends with the extension. But, #2 redirects and doesn't end with .jpg. Because of this, in some cases, you can't use the links you get from Google directly.
Fortunately, Drive Explorer can help you generate links that behave like the first URL given above. For this, open the Google Drive folder that contains the images with Drive Explorer in your browser.
Before fetching files, under Fields select Image Link. Then, click on Fetch files button to list the files. Next, select the files for which you want direct image links and then select Generate image links button in the top left. Now, Drive Explorer will generate links for those images.
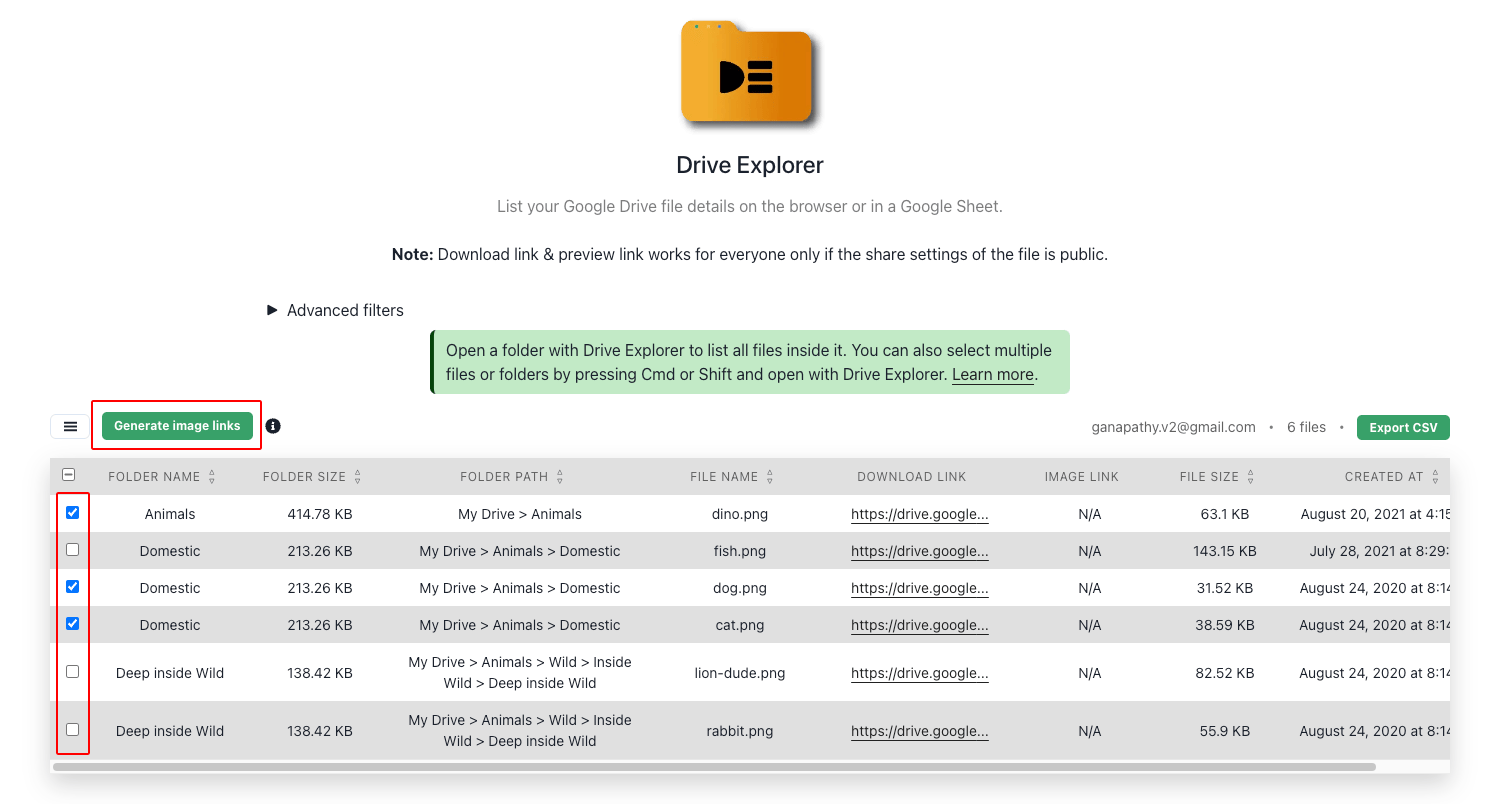
The selected files should be images and must have been public for this to work. Drive Explorer uploads the images to Google Cloud Storage and shares the link with you. Below, you can find the Preview Link and Image Link from Drive Explorer.
- Preview link -
https://drive.google.com/uc?id=1r3yRTh2K5KT5WmKlFYr25IWH46-gGoGK&export=view - Image link -
https://storage.googleapis.com/drive-explorer/1516/1Njov4VdNrh_CFog3M5JcLyRsb8yKUhfD/dino.png
As you can see, the second link is much more flexible and works across services. You can use this link as product images on your WooCommerce store when the first link is not accepted.
Using Rclone
Rclone is my favorite CLI tool for interacting with cloud storage providers. There's almost nothing you can't do with it. If you love CLIs like me, you'll prefer this method over others.
Even if you are not familiar with working with the command line, you can give it a try. You can get a lot of work done in less time.
First, you need to install Rclone on your system. If you are a Mac user, you can install it using Homebrew, brew install rclone.
Now, you need to configure Rclone to connect with your Google Drive. It can be done in 2 minutes.
When configuring you can either give full access or read-only access to Rclone. If you are planning on changing permission setting directly from the command line, give full access. Rclone is open-source and we can trust it. Later, I'll explain how to share/rename files from the terminal.
Rclone won't give you fully formatted URLs like Drive Explorer. You can fetch the IDs of files and construct the URL. This is because Rclone supports a whole lot of other cloud storage services. It should be generic. I will explain how to obtain the file IDs & construct the required link format.
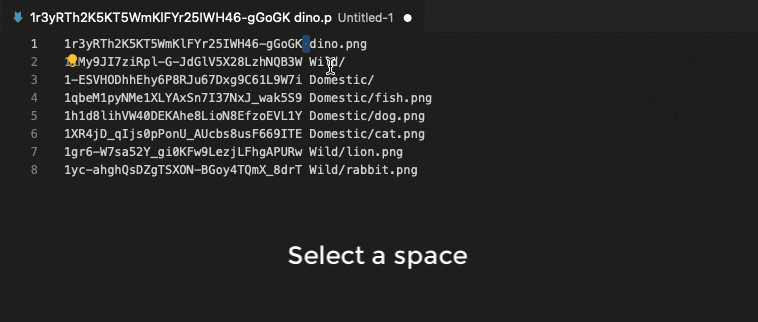
Let's take the same Animals folder example we took with Drive Explorer. Here's how you can get the IDs of all the images. I'll explain the command & options used.
rclone lsf gdrive:Animals -R -F ip -s ' '
1r3yRTh2K5KT5WmKlFYr25IWH46-gGoGK dino.png
11My9JI7ziRpl-G-JdGlV5X28LzhNQB3W Wild/
1-ESVHODhhEhy6P8RJu67Dxg9C61L9W7i Domestic/
1qbeM1pyNMe1XLYAxSn7I37NxJ_wak5S9 Domestic/fish.png
1h1d8lihVW40DEKAhe8LioN8EfzoEVL1Y Domestic/dog.png
1XR4jD_qIjs0pPonU_AUcbs8usF669ITE Domestic/cat.png
1gr6-W7sa52Y_gi0KFw9LezjLFhgAPURw Wild/lion.png
1yc-ahghQsDZgTSXON-BGoy4TQmX_8drT Wild/rabbit.png
rclone - command to use Rclone utility
lsf - list the contents as a standard output to the terminal in the required format.
gdrive:Animals - gdrive is the remote name I chose for my Google Drive. Animals is the top-level folder in my Google Drive. We are going to fetch files from there.
-R - recursively fetch files. Without this option, only the folder Wild and file dino.png would have been listed as they are the immediate children of the folder Animals.
-F ip - -F denotes the format option. ip denotes we need the ID of the file & path of the file relative to the folder Animals.
-s ' ' - -s means we are going to provide a custom separator. ' ' means I want an empty space to be the separator. The default is a semi-colon.
Now, we have the IDs of the files. All we need to do is append the other part of the URL to get meaningful links. You can edit multiple lines at once. If you have VS Code installed, open it or open online VS Code, open a new file and copy and paste the result of the above command.
We are going to delete the file paths and append the required string to the file IDs to create links using keyboard shortcuts.
- Select the space between the first ID & path.
- Press
Ctrl (Cmd) + Shift + Lto create multiple cursors in the space position. - Now, press
backspace,Ctrl (Cmd) + Shift + →&backspace. - You must only be seeing the file IDs on the screen now.
- Press
Ctrl (Cmd) + ←. The cursors should be in the starting positions of the lines. - Based on what you want, pick one of the below strings and paste it in VS Code. Your links are ready now.
For direct download links, https://drive.google.com/uc?export=download&id=.
For embed/host links & to render images inside browser, https://lh3.googleusercontent.com/d/.
Change the Share status of files from the Terminal
The below command will make your file/folder/image accessible to anyone with the link. The command comes in handy if the file/folder's permissions are not already changed.
Replace gdrive with your remote name & Animals/Domestic/fish.png with your file/folder path.
rclone link gdrive:Animals/Domestic/fish.png
https://drive.google.com/open?id=1qbeM1pyNMe1XLYAxSn7I37NxJ_wak5S9
To rename files
To rename both files & folders you can use the following command. It renames fish to gold-fish. Replace gdrive & names to make it work for you.
rclone moveto gdrive:Animals/Domestic/fish.png gdrive:Animals/Domestic/gold-fish.png
You can also bulk rename Google Drive files using Smart Bulk Renamer.
Also see: sort Google Drive files
I have built an app to check the things that matter to you the most with a single click. If this interests you, you can give it a try on getradar.co.