
Why & How I run 5 different applications on the same server
I run a ~$25 server on GCP with 1vCPU, 3.75GB of RAM. The server hosts 2 Node.js backend apps & 3 Next.js frontend apps. From database to Redis, everything runs on the same server.
Why?
- I like to have complete control over the applications I run.
- To reduce the monthly server costs.
- As I'm an Indie developer, for the new ideas I get, I use the same server instead of booting a new one.
People more often than not overthink their infra, overestimate their app resource usage, and end up spending more than they need to on servers. This blog attempts to explain how far we can go with a $25/month server.
On the server, I have set up everything from push-to-deploy to automatic backups for a smooth operation. If you are interested in knowing just that, please skip to the how I do it section.
Resource Utilized
Here's a screenshot of the htop command on the server.

You can notice that my applications hardly use any resources. This is because I don't run any memory or CPU intensive tasks on the server. Every request to the backend server will run a DB query, fetch data from Redis or hit the Stripe/PayPal APIs.
Okay. Let's analyse the amount of traffic this server handles with NGINX access logs. For this, I will consider 7-day traffic from May 2nd to May 8th.
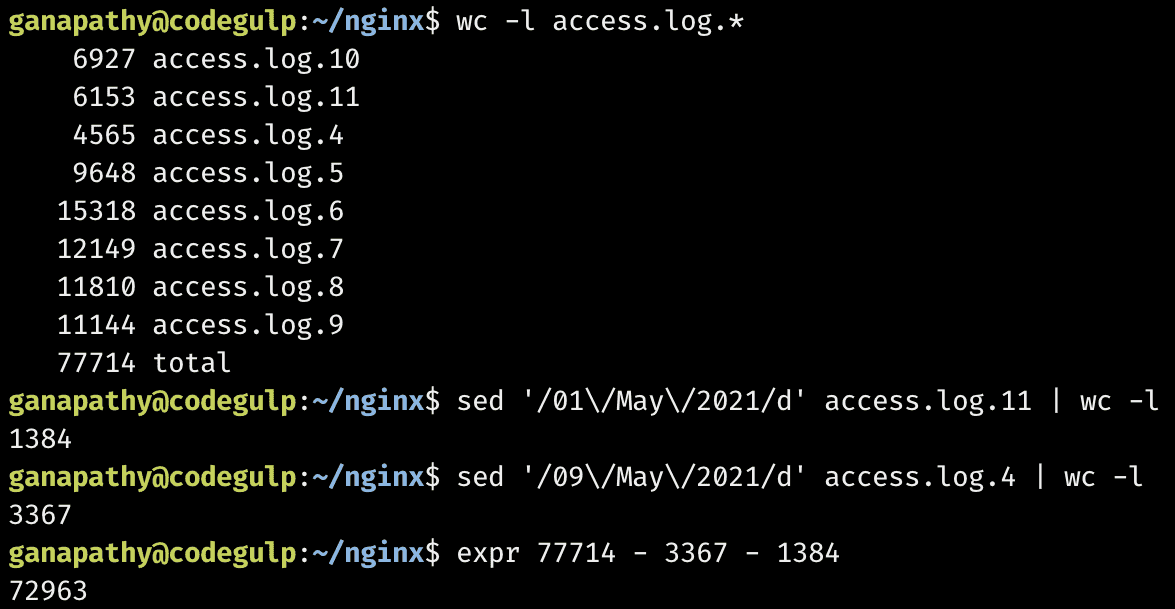
We can conclude that the server has handled 72963 requests in 7 days, not much, in my opinion. As my applications don't take much memory or CPU, I can run more apps without any trouble, in my opinion.
You may ask why not run this blog also on that server. It's in the plan already, and I'll migrate this blog over to the 5 apps server soon from the $5 Vultr machine.
Before jumping into the how part of the blog, this setup may not be ideal for everyone. There's no one size fits all. However, this works well for me. You can start with a similar setup and scale up when needed.
How?
In this section, I will explain how I effortlessly run 5 applications on the same server. Whenever I deploy a new app to this server, I have to set up the following 7 exactly one time after that everything is automated.
Process Manager
The Process manager handles the processes spawned by the web applications. Essential features to look for in a process manager,
- Automatic restart in the event of application crash
- Access to logs, metrics, app status
I use pm2 for my JS based applications. You can find similar tools for the language of your choice. Here's the pm2 status of the 5 applications.
DNS
DNS gives a human-readable address to your webserver. Technically, DNS helps the browsers reach your server by mapping the URL to the IP address of your server.
After purchasing a domain name, you need to configure it to talk with your server. In other words, whenever someone hits enter after filling the address bar with the domain name in the browser, the request must be processed by your server.
Domain name configuration is straightforward. All you need to know is your server IP and credentials to log in to your domain registrar. Minimum, you need to add 1 DNS record for your domain for it to resolve successfully. Here's my setup,
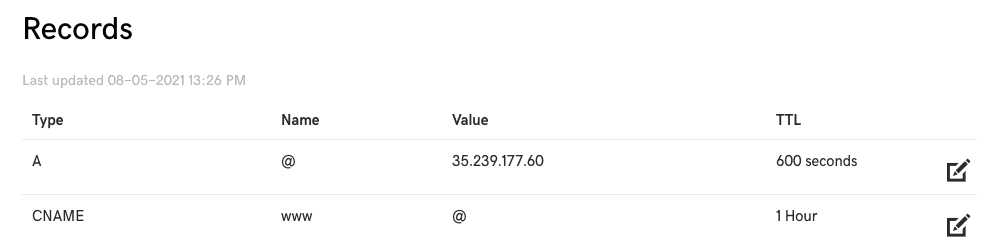
I have to add an A record to map the domain name to the IP and a CNAME record to resolve the www version of the domain name.
Webserver
Web server is the software that exposes your application to the internet. There are many choices available for you to pick. The most popular ones are Apache & NGINX. According to the Netcraft web survey, NGINX is the top web server by market share. I use NGINX.
After successfully installing NGINX in your server, if you access your server IP or the assigned URL from your browser. You should see something like,
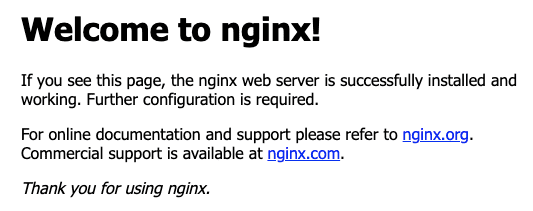
If you don't see the message, it means port 80 is not open yet on your server. So, you have to open it and try again.
Your web applications usually run on other ports. But, the URL requests without ports by default comes to port 80 if it's an HTTP request and port 443 if it's an HTTPS request. NGINX, by default, serves the static page you saw in the above image. To make it serve your application, you need to proxy pass.
Proxy pass
It is an instruction that tells NGINX to redirect the requests to a particular port within the server. Line number #45 is responsible for this in the NGINX configuration given below.
NGINX configuration
You can configure the way you want. I have shared an example I use for one of my applications in the production for your understanding. You can use it as it is with minimal changes. NGINX configs usually reside in this location - /etc/nginx/sites-available/default.
I have added comments for a better understanding of how it works. After updating the config, you can test your config by issuing nginx -t command. If you see no error, reload the NGINX config by issuing the command nginx -s reload in the terminal.
Now, when you access the domain in the browser, you should see your application in action.
server {
  # Handles all http & https requests of the www version of your domain
  listen 80;
  listen 443 ssl http2;

  server_name www.getradar.co;

  # Location of the SSL certificates. Refer to SSL certificate section to know more
  ssl_certificate /etc/letsencrypt/live/getradar.co/fullchain.pem;
  ssl_certificate_key /etc/letsencrypt/live/getradar.co/privkey.pem;

  # Redirects all www version of http & https requests to the non-www https version of the website
  return 301 https://getradar.co$request_uri;
}

server {
  # Handles all http requests of the non-www version of your domain
  listen 80;

  server_name getradar.co;

  # Redirects all non-www version of http requests to the non-www https version of the website
  return 301 https://getradar.co$request_uri;
}

server {
  # Handles all https requests of the non-www version of your domain
  listen 443 ssl http2;
  listen [::]:443 ssl http2;

  server_name getradar.co;

  # Location of the SSL certificates. Refer to SSL certificate section to know more
  ssl_certificate /etc/letsencrypt/live/getradar.co/fullchain.pem;
  ssl_certificate_key /etc/letsencrypt/live/getradar.co/privkey.pem;

  location / {
  	  # Setting important headers
      proxy_set_header X-Forwarded-For $proxy_add_x_forwarded_for;
      proxy_set_header X-Forwarded-Proto $scheme;
      proxy_set_header X-Real-IP $remote_addr;
      proxy_set_header Host $http_host;

      # Passes the control to your application which runs on port 7000
      proxy_pass http://127.0.0.1:7000;
  }

  # For creating SSL certificates
  location ~ /.well-known {
      allow all;
  }

  # Setting the limit for the size of POST request body
  client_max_body_size 50m;
}
There are several server blocks in the NGINX configuration to make the website SEO friendly. All these server blocks signal search engine bots that there is only one working version of the website available, the non-www HTTPS version. All other versions of the domain will 301 permanent redirect to that.
You can repeat the above configuration in the same NGINX conf file for different applications by changing the domain name, SSL certificate path & port.
SSL Certificate
Starting July 2018, Chrome started showing a not secure alert for all non-HTTPS websites. So, to get the padlock in the left of your address bar and make people feel safe using your website, you need to get an SSL certificate for your domain name.
Fortunately, you can get it for free. Certbot makes it easy to get one. SSL certificates you get from Let's encrypt (Certbot uses it) expire in 90 days. You can configure Certbot to auto-renew it.
You can find instructions to install Certbot according to your server specifications. On the homepage, you will find two drop-downs like the one below. Choose NGINX in the first drop-down and your server operating system (issue uname -a command to find out) in the second.

After generating the certificates using Certbot, don't forget to update your NGINX config. In some cases, Certbot will automatically update your NGINX config. You can check if SSL works for your site by loading it in the browser or using an SSL checker.
You need to generate a unique SSL certificate for every application.
CI & CD (push-to-deploy)
This is one of the main reasons why most people go for the PaaS solutions like Heroku, Netlify. Indeed, it is magic. Isn't it? As soon as you push the code to your source control, your site will be deployed with the new changes.
We are going to use GitHub actions for push-to-deploy with self-hosted runners. It is a two-step process.
- Configuring self-hosted runners (Once for every GitHub repository or Once for the GitHub organisation)
- Adding workflow YAML to the repository.
Self-hosted runners
This is a utility process that runs in the background and signals your server whenever something is pushed to the repository of your choice or one of the repositories in an organisation GitHub account depends on how you configure it.
To run a self-hosted runner on your server for push-to-deploy, in the repository page or the organisation page, select Settings → Actions → Runners → Add new → New runner. Next, select the appropriate Operating System and Architecture and follow the instructions by GitHub.
When you configure the runner, GitHub will ask you to run the command ./run.sh at last. After running the command, when you close the terminal session, the runner is terminated.
To constantly watch for repository pushes and to auto-deploy, runners have to run all the time in the background. You can use the command below for that.
# Sends the runner process to the background and runs even after quitting the session
nohup ./run.sh >> ./run.log 2>&1 &
If you had created a runner for your organisation, it becomes available for all the repositories under that organisation. That's how I use the runners as I have more than one project.
Workflow
We successfully configured our server to watch for the pushes in our repository. Now, we need to instruct what the server should do after a successful push. We configure this in the repository. You can do this by creating a YAML file (a file with .yml extension) inside .github/workflows from the root of your project.
Check the GitHub actions YAML workflow syntax. Trust me, you can bend it to your will. I have shared the workflow script I use in one of my projects below. It has useful comments so that you can understand it better.
name: Build & Deploy
defaults:
  run:
  	# To make all system executables available for the runner process when this workflow runs
    shell: bash -l {0}

# Controls when the action will run.
on:
  # Triggers the workflow on push events but only for the main branch
  push:
    branches: main

  # Allows you to run this workflow manually from the Actions tab
  workflow_dispatch:

# A workflow run is made up of one or more jobs that can run sequentially or in parallel
jobs:
  # This workflow contains a single job called "build"
  build:
    # This line is important for running the job on your server.
    runs-on: self-hosted

    # Steps represent a sequence of tasks that will be executed as part of the job
    steps:
      # Checks-out your repository under $GITHUB_WORKSPACE, so your job can access it
      - uses: actions/checkout@v2
        # clean: false is important else your project build files are removed resulting in a application downtime.
        with:
          clean: false

      # Installs the dependencies defined in package.json uses npm or yarn automatically
      - name: Install dependencies
      	# Ready-made open-source action script for installing dependencies of JS project → https://github.com/bahmutov/npm-install
        uses: bahmutov/npm-install@v1

      # Prepares the build
      - name: Build
        run: yarn build

	  # Deploys the application
      - name: Deploy
      	# After building restarts the application if already exists or starts a new server
        run: pm2 restart getradar.co || pm2 start yarn --name "getradar.co" --interpreter bash -- start

      # Sends a slack notification about the deployment status
      - name: Slack Notification
        # Ready-made open-source action script for pushing Slack notifications → https://github.com/8398a7/action-slack
        uses: 8398a7/action-slack@v3
        with:
          status: custom
          fields: repo,message,commit,author,action,workflow,job,took
          custom_payload: |
            {
              username: 'Deploy Bot',
              icon_emoji: '${{ job.status }}' === 'success' ? ':rocket:' : '${{ job.status }}' === 'failure' ? ':sweat:' : ':confused:',
              attachments: [{
                color: '${{ job.status }}' === 'success' ? 'good' : '${{ job.status }}' === 'failure' ? 'danger' : 'warning',
                text: `Radar Landing\n${process.env.STATUS} in ${process.env.AS_TOOK}\n${process.env.AS_MESSAGE}`,
              }]
            }
        env:
          # You need to define this secret in GitHub Settings → Secrets
          SLACK_WEBHOOK_URL: ${{ secrets.SLACK_WEBHOOK_URL }} # required
          STATUS: ${{ job.status }}
        if: always() # Pick up events even if the job fails or is canceled.
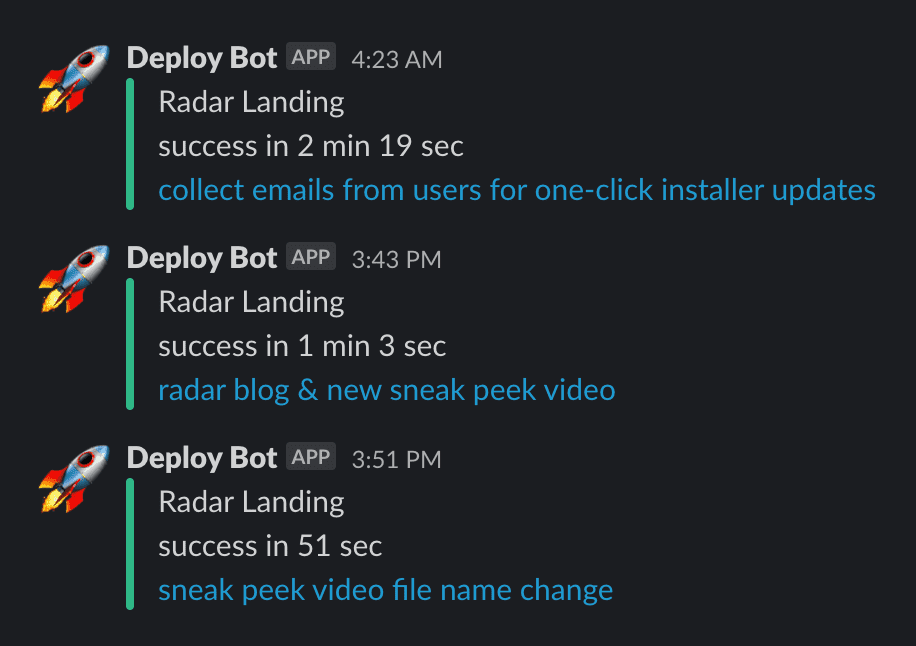
Whenever I push something to the repository's main branch, the changes are automatically deployed to my GCP server and, I get the deployment alerts on Slack.
CDN
CDN helps your website load faster worldwide. As my server is located in the US, my application will load slowly for the people accessing it from Asia due to the distance between the server and browser.
When you use a CDN, your application assets are cached and kept in different servers worldwide. So, when users from Asia load my application, they will be served from the nearest server. Hence, the application will load quicker for them.
I recently started using bunny CDN. It is inexpensive and performs better for me so far.
Automatic Backups
To be honest, I'm not proud of the backup setup I have now. As my database doesn't grow much daily, I dump the database and save it to Google Drive. I know I have to do better. Maybe Google cloud Storage or S3 will be a better option. In the future, for sure.
I have a cronjob that runs once a day to back up the data to Google Drive. I use this code I wrote for Ghost blog backup.
If you made it this far, I hope you found the article helpful. Let me know if you have any suggestion, query or feedback in the comments or on Twitter.
I have built an app to check the things that matter to you the most with a single click. If this interests you, you can give it a try on getradar.co.